Fumbling with cables while a boardroom or classroom waits is a high-stress scenario that derails thousands of presentations daily. Understanding the precise steps to link your computer to an external display ensures your media renders correctly without awkward technical delays.
In summary, learning how to connect laptop to projector works by matching the physical or wireless output of your computer to the corresponding input channel of the projection unit, then configuring the operating system to transmit the display signal. The bottom line is that while hardware configurations vary between modern USB-C interfaces and legacy VGA ports, the underlying software mapping remains highly standardized across Windows and macOS platforms.
This comprehensive technical manual breaks down every connection vector, protocol setting, and troubleshooting framework required to establish a flawless display link.
What Hardware Interfaces are Required to Connect a Laptop to a Projector?
Establishing a physical connection requires identifying the available input and output ports on both devices. Laptops have aggressively transitioned away from legacy ports to favor slim form factors, making adapters or specialized cables a common necessity in commercial environments.
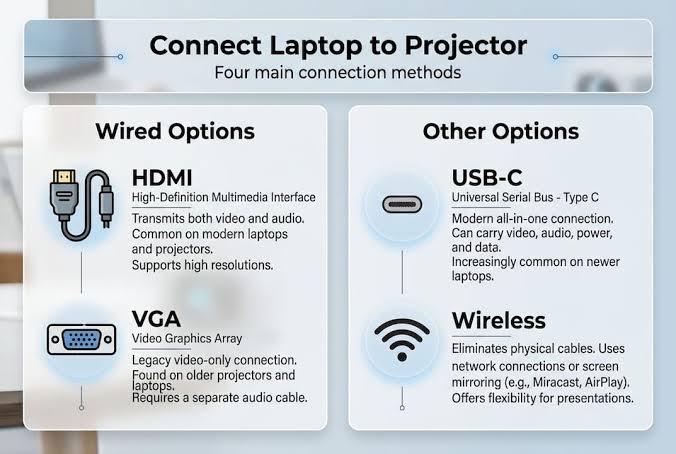
The primary hardware interfaces found on modern display equipment include:
- HDMI (High-Definition Multimedia Interface): The most prevalent standard for transmitting uncompressed digital video and audio data simultaneously.
- USB-C / Thunderbolt: The modern standard found on ultra-thin laptops and premium enterprise projectors. It utilizes DisplayPort Alternate Mode to push video, audio, power, and data through a single interface.
- DisplayPort / Mini DisplayPort: High-bandwidth digital interfaces commonly found on enterprise-grade workstations and commercial projection setups.
- VGA (Video Graphics Array): A legacy, 15-pin analog interface that only transmits video data, requiring a separate auxiliary cable for sound.
Understanding the technical boundaries of these ports helps prevent resolution degradation or signal loss during your presentation.
| Interface Type | Signal Category | Maximum Practical Resolution | Native Audio Support | Common Use Case |
| HDMI 2.1 | Digital | 8K at 60Hz / 4K at 120Hz | Yes (Multi-channel) | Modern laptops, media rooms |
| USB-C (DP Alt-Mode) | Digital | 8K at 60Hz | Yes | Ultrabooks, modern smart systems |
| DisplayPort 1.4 | Digital | 8K at 60Hz | Yes | Enterprise workstations, stages |
| VGA (D-Sub) | Analog | 1920×1200 at 60Hz | No (Requires 3.5mm Jack) | Legacy conference rooms, schools |
How Do You Establish a Wired Connection via HDMI or USB-C?
Physical cables remain the gold standard for presentation environments due to their near-zero latency and immunity to radio frequency interference. When using a hardwire connection, proper sequencing prevents handshake failures, which are communication errors where the laptop and display fail to recognize each other’s encryption and resolution parameters.
Step-by-Step Wired Hardware Sequence
1.Verify Power States :Prerequisite.
Ensure both the laptop and the projection unit are powered on and sitting at their respective home screens or desktops before inserting any data lines.
2.Affix the Interface Cable :Execution.
Insert the HDMI, USB-C, or VGA cable firmly into the output port of your laptop, then connect the opposite terminal directly to the corresponding input port on the projector.
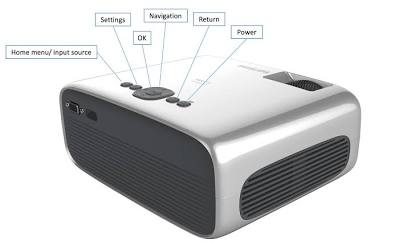
3.Select the Projector Input Channel :Configuration.
Locate the hardware control panel or the remote control for the projection system. Press the Source or Input selection button repeatedly until the active display matching your physical cable port is highlighted.
4.Trigger Operating System Detection :Finalization.
Allow up to 5 seconds for the graphics card to process the Extended Display Identification Data (EDID) transmitted by the display hardware to auto-negotiate native resolutions.
If the projection screen remains completely dark or displays a “No Signal” prompt after this sequence, the breakdown exists within the operating system display settings or the input source selection.
How Do You Configure Windows and macOS Software Settings?
Once the physical or wireless pipeline is open, the operating system must be told how to handle the secondary display canvas. Both Windows and macOS provide native environment controls to manage this behavior.
Managing Displays in Windows 11 and Windows 10
Windows handles external displays through a unified projection flyout menu. Pressing the physical Windows Key + P combination on your keyboard brings up the display architecture options instantly:
- PC Screen Only: Disables the external projection unit, routing all graphics processing exclusively to the integrated laptop monitor.
- Duplicate: Mirrors the laptop screen exactly, locking both screens to the lowest common native resolution supported by the hardware pair.
- Extend: Creates a massive, multi-monitor desktop workspace where windows can be dragged freely between the laptop screen and the projected canvas.
- Second Screen Only: Deactivates the laptop panel entirely, utilizing the projection screen as the primary workstation monitor.
For fine-tuning resolution or fixing scaling artifacts, navigate to Settings > System > Display. Ensure the refresh rate is set to a stable 60Hz to eliminate flickering across longer cable runs.
Managing Displays on Apple macOS
Apple computers handle external video routing through the system architecture panels rather than a keyboard hotkey.
- Click the Apple Menu icon in the top-left corner of your desktop environment and select System Settings.
- Scroll down the sidebar menu and select Displays.
- Select the connected projector arrangement icon shown at the top of the interface pane.
- Open the Use As drop-down menu to select between Main Display, Extended Display, or Mirror for Built-in Display.
If text looks blurry or small on the screen, toggle the Scaled resolution option inside this menu. Selecting a resolution that perfectly matches the native aspect ratio of the projection unit eliminates black vertical bars on the sides of your presentation slide deck.
How Do You Connect a Laptop to a Projector Wirelessly?
Wireless mirroring protocols have become standard infrastructure across corporate networks. Removing the physical cable gives the presenter greater mobility, but it introduces network configuration dependencies that must be managed.
Native Wireless Mirroring Frameworks
Most enterprise environments deploy one of three standard wireless casting ecosystems:
- Miracast (Windows Native): Uses Wi-Fi Direct protocols to establish a secure, peer-to-peer digital connection directly between a Windows laptop and a compatible projector without requiring an active local internet connection.
- AirPlay (macOS Native): Requires both the MacBook and the receiver hardware to sit on the exact same local area network subnet. AirPlay streams high-fidelity video over local routing paths.
- Chromecast / Google Cast (Cross-Platform): Operates inside the Google Chrome browser ecosystem or via native Android systems, allowing targeted tab casting or entire desktop mirroring over a shared network connection.
Step-by-Step Windows Wireless Connection Procedure
- Ensure the target projection hardware has its wireless discovery mode or native casting application running on-screen.
- Press the Windows Key + K combination to launch the native Windows Cast communication panel.
- Wait for the discovery cycle to populate the device registry list, then select your specific projector asset name.
- Enter any temporary personal identification number (PIN) code displayed on the projection screen into your laptop window to authorize the secure wireless stream.
Frequently Asked Questions About Connecting Laptops to Projectors
Why does my laptop say connected but the projector shows “No Signal”?
This error means the physical connection is detected, but no data is flowing through the pipeline. The issue is almost always fixed by checking your input source channel on the projector or pressing Windows Key + P to ensure you are not set to “PC Screen Only” mode.
How do I get sound to play from the projector instead of my laptop?
For Windows setups, click the speaker icon on your taskbar, select the audio output arrow, and change the device to the named HDMI or display driver. On macOS, navigate to System Settings > Sound > Output and select the projector hardware line item from the device path list.
What should I do if my ultra-thin laptop doesn’t have an HDMI port?
You will need to buy a high-quality USB-C to HDMI adapter or a multi-port distribution hub. Ensure the adapter specifications explicitly state support for DisplayPort Alternate Mode to ensure video data can pass through your computer’s USB system correctly.
What is the Key Takeaway for Presentation Readiness?
The future of display connectivity points directly toward unified USB-C hardware lines and low-latency wireless streaming systems. However, because conference spaces and lecture halls contain highly diverse legacy equipment, carrying a baseline physical adapter kit remains a professional operational necessity. By verifying port compatibility, mastering your operating system’s presentation shortcuts, and using a systematic troubleshooting framework, you eliminate technical friction points entirely. Your next step should be a quick hardware audit of your most frequent presentation environments to ensure you have the precise adapter lines ready before your next scheduled meeting.